Back to Browse
Free

Server data from the Official MCP Registry
Control monitor brightness, contrast, power and input via DDC/CI with MCP and MQTT support.
About
Control monitor brightness, contrast, power and input via DDC/CI with MCP and MQTT support.
Security Report
10.0
Low Risk10.0Low RiskValid MCP server (0 strong, 2 medium validity signals). No known CVEs in dependencies. Imported from the Official MCP Registry. 1 finding(s) downgraded by scanner intelligence.
8 files analyzed · 1 issue found
Security scores are indicators to help you make informed decisions, not guarantees. Always review permissions before connecting any MCP server.
How to Install
Add this to your MCP configuration file:
{
  "mcpServers": {
    "io-github-defozo-ddc-ci-control-bridge": {
      "args": [
        "-y",
        "ddc-ci-control-bridge"
      ],
      "command": "npx"
    }
  }
}Documentation
View on GitHubFrom the project's GitHub README.
DDC/CI Control Bridge
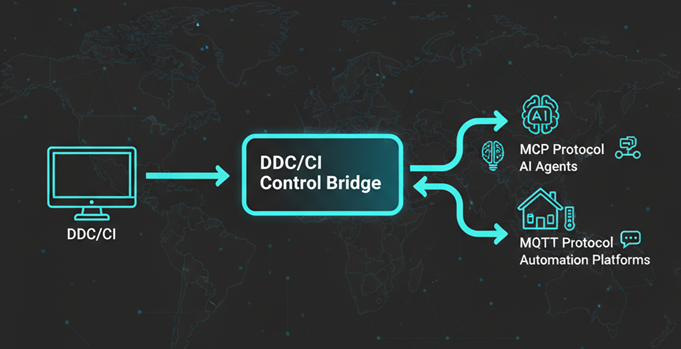


Multi-protocol server for DDC/CI monitor control with MCP and MQTT support.
Features
- DDC/CI Monitor Control: Read and write VCP codes to control monitor brightness, contrast, input source, and more
- Model Context Protocol (MCP): Server with resources and tools for AI/agent integration
- MQTT Client: Connect to any MQTT broker for IoT/automation platforms
- Home Assistant auto-discovery support
- Generic MQTT pub/sub for custom integrations
- Cross-Platform: Works on Windows, Linux, and macOS
- Dual Distribution: Available as standalone executable or npm package
Quick Start
Installation
Option 1: NPM Package (Global)
npm install -g ddc-ci-control-bridge
ddc-ci-bridge
Option 2: NPX (No Install)
npx ddc-ci-control-bridge
Option 3: Standalone Executable
Download the binary for your platform from GitHub Releases:
- Windows:
ddc-ci-bridge-win.exe - Linux:
ddc-ci-bridge-linux - macOS:
ddc-ci-bridge-macos
⚠️ Note: The executable requires DDC_API_KEY environment variable to be set, or it will exit immediately.
Windows:
# Set API key (required)
set DDC_API_KEY=your-secret-key

# Run the executable
ddc-ci-bridge-win.exe

# Or set multiple environment variables
set DDC_API_KEY=your-secret-key
set MQTT_ENABLED=true
set MQTT_HOST=192.168.1.100
ddc-ci-bridge-win.exe
Linux/macOS:
# Make executable (first time only)
chmod +x ddc-ci-bridge-linux  # or ddc-ci-bridge-macos

# Run with API key (required)
DDC_API_KEY=your-secret-key ./ddc-ci-bridge-linux

# Or with multiple environment variables
DDC_API_KEY=your-secret-key MQTT_ENABLED=true MQTT_HOST=192.168.1.100 ./ddc-ci-bridge-linux
Using with MCP Clients:
Configure your MCP client to use the executable path:
{
  "mcpServers": {
    "ddc-ci-bridge": {
      "command": "C:\\path\\to\\ddc-ci-bridge-win.exe",
      "args": [],
      "env": {
        "MQTT_ENABLED": "false"
      }
    }
  }
}
MCP Client Setup
Choose between Local (stdio) or Remote (HTTP) setup depending on your needs:
- Local Setup: Run MCP server on the same machine as your monitors (recommended for most users)
- Remote Setup: Run MCP server on a monitor-connected machine, access from other devices
🖥️ Local Setup (stdio - Same Machine)
Use this if your MCP client is on the same machine as your monitors.
Go to: Settings → Cursor Settings → MCP → Add new global MCP server

Or paste the following configuration into your ~/.cursor/mcp.json file:
{
  "mcpServers": {
    "ddc-ci-bridge": {
      "command": "npx",
      "args": ["-y", "ddc-ci-control-bridge"],
      "env": {
        "MQTT_ENABLED": "false",
        "MQTT_HOST": "localhost",
        "MQTT_PORT": "1883"
      }
    }
  }
}
Optional MQTT: Set MQTT_ENABLED=true and configure MQTT_HOST to your MQTT broker IP for automation platform integration.
Add this to your VS Code MCP config file:
"mcp": {
  "servers": {
    "ddc-ci-bridge": {
      "type": "stdio",
      "command": "npx",
      "args": ["-y", "ddc-ci-control-bridge"],
      "env": {
        "MQTT_ENABLED": "false"
      }
    }
  }
}
Open Claude Desktop developer settings and edit your claude_desktop_config.json file:
{
  "mcpServers": {
    "ddc-ci-bridge": {
      "command": "npx",
      "args": ["-y", "ddc-ci-control-bridge"],
      "env": {
        "MQTT_ENABLED": "false"
      }
    }
  }
}
Run this command:
claude mcp add ddc-ci-bridge -- npx -y ddc-ci-control-bridge
Add this to your Windsurf MCP config file:
{
  "mcpServers": {
    "ddc-ci-bridge": {
      "command": "npx",
      "args": ["-y", "ddc-ci-control-bridge"],
      "env": {
        "MQTT_ENABLED": "false"
      }
    }
  }
}
Add this to your Cline MCP configuration:
{
  "mcpServers": {
    "ddc-ci-bridge": {
      "command": "npx",
      "args": ["-y", "ddc-ci-control-bridge"],
      "env": {
        "MQTT_ENABLED": "false"
      }
    }
  }
}
Add this to your Zed settings.json:
{
  "context_servers": {
    "DDC/CI Bridge": {
      "source": "custom",
      "command": "npx",
      "args": ["-y", "ddc-ci-control-bridge"],
      "env": {
        "MQTT_ENABLED": "false"
      }
    }
  }
}
Add this to your Roo Code MCP configuration:
{
  "mcpServers": {
    "ddc-ci-bridge": {
      "command": "npx",
      "args": ["-y", "ddc-ci-control-bridge"],
      "env": {
        "MQTT_ENABLED": "false"
      }
    }
  }
}
Option A: Using the UI
- Click the hamburger menu
- Select Settings
- Navigate to Tools section
- Click + Add MCP button
- Enter command:
npx -y ddc-ci-control-bridge - Name: DDC/CI Bridge
- Click Add
Option B: Manual Configuration
Add to settings.json:
"augment.advanced": {
  "mcpServers": [
    {
      "name": "ddc-ci-bridge",
      "command": "npx",
      "args": ["-y", "ddc-ci-control-bridge"],
      "env": {
        "MQTT_ENABLED": "false"
      }
    }
  ]
}
- Go to
Settings→Tools→AI Assistant→Model Context Protocol (MCP) - Click
+ Add - Select As JSON from the dropdown
- Add this configuration:
{
  "mcpServers": {
    "ddc-ci-bridge": {
      "command": "npx",
      "args": ["-y", "ddc-ci-control-bridge"],
      "env": {
        "MQTT_ENABLED": "false"
      }
    }
  }
}
- Click
Applyto save changes
- Navigate
Settings→AI→Manage MCP servers - Click
+ Addbutton - Paste this configuration:
{
  "DDC/CI Bridge": {
    "command": "npx",
    "args": ["-y", "ddc-ci-control-bridge"],
    "env": {
      "FASTMCP_API_KEY": "your-api-key-here",
      "MQTT_ENABLED": "false"
    },
    "working_directory": null,
    "start_on_launch": true
  }
}
- Click
Save
Add to your Codex MCP configuration:
[mcp_servers.ddc-ci-bridge]
command = "npx"
args = ["-y", "ddc-ci-control-bridge"]

[mcp_servers.ddc-ci-bridge.env]
MQTT_ENABLED = "false"
Windows Users: Use full paths if you encounter timeout errors:
[mcp_servers.ddc-ci-bridge]
command = "cmd"
args = ["/c", "npx", "-y", "ddc-ci-control-bridge"]
startup_timeout_ms = 20_000

[mcp_servers.ddc-ci-bridge.env]
SystemRoot = "C:\\Windows"
FASTMCP_API_KEY = "your-api-key-here"
MQTT_ENABLED = "false"
- Navigate to
Program(right side) →Install→Edit mcp.json - Add this configuration:
{
  "mcpServers": {
    "DDC/CI Bridge": {
      "command": "npx",
      "args": ["-y", "ddc-ci-control-bridge"],
      "env": {
        "MQTT_ENABLED": "false"
      }
    }
  }
}
- Click
Save - Toggle the MCP server on/off from the right side panel
- Open Qodo Gen chat panel in VSCode or IntelliJ
- Click Connect more tools
- Click + Add new MCP
- Add this configuration:
{
  "mcpServers": {
    "ddc-ci-bridge": {
      "command": "npx",
      "args": ["-y", "ddc-ci-control-bridge"],
      "env": {
        "MQTT_ENABLED": "false"
      }
    }
  }
}
- Navigate
Perplexity→Settings - Select
Connectors - Click
Add Connector - Select
Advanced - Enter Server Name: DDC/CI Bridge
- Paste this JSON:
{
  "command": "npx",
  "args": ["-y", "ddc-ci-control-bridge"],
  "env": {
    "FASTMCP_API_KEY": "your-api-key-here",
    "MQTT_ENABLED": "false"
  }
}
- Click
Save
- Navigate
Kiro→MCP Servers - Click
+ Addbutton - Paste this configuration:
{
  "mcpServers": {
    "DDC/CI Bridge": {
      "command": "npx",
      "args": ["-y", "ddc-ci-control-bridge"],
      "env": {
        "MQTT_ENABLED": "false"
      },
      "disabled": false,
      "autoApprove": []
    }
  }
}
- Click
Save
- Open Settings → Plugins
- Enter this JSON:
{
  "mcpServers": {
    "ddc-ci-bridge": {
      "command": "npx",
      "args": ["-y", "ddc-ci-control-bridge"],
      "env": {
        "MQTT_ENABLED": "false"
      }
    }
  }
}
- Save and restart if needed
- Go to Zencoder menu (...)
- Select Agent tools
- Click Add custom MCP
- Add name and server configuration:
{
  "command": "npx",
  "args": ["-y", "ddc-ci-control-bridge"],
  "env": {
    "FASTMCP_API_KEY": "your-api-key-here",
    "MQTT_ENABLED": "false"
  }
}
- Click Install
Add to your Amazon Q configuration:
{
  "mcpServers": {
    "ddc-ci-bridge": {
      "command": "npx",
      "args": ["-y", "ddc-ci-control-bridge"],
      "env": {
        "MQTT_ENABLED": "false"
      }
    }
  }
}
Bun:
{
  "mcpServers": {
    "ddc-ci-bridge": {
      "command": "bunx",
      "args": ["-y", "ddc-ci-control-bridge"],
      "env": {
        "MQTT_ENABLED": "false"
      }
    }
  }
}
Deno:
{
  "mcpServers": {
    "ddc-ci-bridge": {
      "command": "deno",
      "args": [
        "run",
        "--allow-env",
        "--allow-net",
        "npm:ddc-ci-control-bridge"
      ],
      "env": {
        "MQTT_ENABLED": "false"
      }
    }
  }
}
On Windows, use this format (example with Cline):
{
  "mcpServers": {
    "ddc-ci-bridge": {
      "command": "cmd",
      "args": ["/c", "npx", "-y", "ddc-ci-control-bridge"],
      "env": {
        "MQTT_ENABLED": "false"
      },
      "disabled": false,
      "autoApprove": []
    }
  }
}
🌐 Remote Setup (HTTP - Different Machines)
Use this if you want to access monitor controls from a different machine on your network.
- On the machine with monitors, create a
.envfile:
DDC_API_KEY=your-secure-random-api-key-here
MCP_TRANSPORT=sse
MCP_PORT=8000

# Optional: Enable MQTT for automation platforms
MQTT_ENABLED=false
MQTT_HOST=localhost
MQTT_PORT=1883
- Start the server:
npm install -g ddc-ci-control-bridge
ddc-ci-bridge
Or using npx:
npx ddc-ci-control-bridge
- The server will display:
🔌 MCP Server: http://192.168.1.100:8000
   Transport: sse
   API Key: your-api...
Note the IP address and port for client configuration.
Cursor:
{
  "mcpServers": {
    "ddc-ci-bridge": {
      "url": "http://192.168.1.100:8000",
      "headers": {
        "Authorization": "Bearer your-secure-random-api-key-here"
      }
    }
  }
}
VS Code:
"mcp": {
  "servers": {
    "ddc-ci-bridge": {
      "type": "http",
      "url": "http://192.168.1.100:8000",
      "headers": {
        "Authorization": "Bearer your-secure-random-api-key-here"
      }
    }
  }
}
Claude Desktop:
{
  "mcpServers": {
    "ddc-ci-bridge": {
      "url": "http://192.168.1.100:8000",
      "headers": {
        "Authorization": "Bearer your-secure-random-api-key-here"
      }
    }
  }
}
Windsurf:
{
  "mcpServers": {
    "ddc-ci-bridge": {
      "serverUrl": "http://192.168.1.100:8000",
      "headers": {
        "Authorization": "Bearer your-secure-random-api-key-here"
      }
    }
  }
}
Note: Replace 192.168.1.100 with the actual IP address of your monitor-connected machine, and use the same API key you configured in the server's .env file.
Configuration
- Create a
.envfile:
cp .env.example .env
- Edit
.envand configure:
DDC_API_KEY=your-secret-api-key-here

# Enable MQTT for automation platforms (optional)
MQTT_ENABLED=false
MQTT_HOST=localhost
MQTT_PORT=1883
To enable MQTT: Set MQTT_ENABLED=true and change MQTT_HOST to your MQTT broker IP (e.g., Home Assistant IP).
- Start the server:
npm run dev
MQTT Integration
This server acts as an MQTT client and can connect to any MQTT broker.
Supported Platforms
- Home Assistant: Auto-discovery via MQTT Discovery Protocol → See Home Assistant Guide
- openHAB: MQTT binding with manual thing configuration
- Node-RED: Subscribe to topics for custom flows
- Domoticz: MQTT integration
- Generic MQTT: Any platform that supports MQTT pub/sub
MQTT Topics
ddc-monitor/{index}/brightness/set|get
ddc-monitor/{index}/contrast/set|get
ddc-monitor/{index}/vcp/{code}/set|get
ddc-monitor/{index}/power/set
ddc-monitor/{index}/state
ddc-monitor/bridge/status
MCP Resources
monitor://list- List all available monitorsmonitor://{index}/capabilities- Full VCP code scan resultsmonitor://{index}/current-values- Current values of all supported codesmonitor://{index}/info- Monitor metadata
MCP Tools
get_vcp_code- Read a specific VCP code valueset_vcp_code- Write a value to a VCP codeget_brightness- Get monitor brightness (0-100)set_brightness- Set monitor brightness (0-100)refresh_monitors- Re-scan monitors and VCP capabilities
Development
Build
npm run build
Build Executables
npm run build:executables
This creates standalone executables in dist/bin/ for Windows, Linux, and macOS.
Run in Development
npm run dev
Requirements
- DDC/CI Support: Your monitor must support DDC/CI (most modern monitors do)
- DDC/CI Enabled: Enable DDC/CI in your monitor's OSD settings
- Permissions: On Linux, you may need to add your user to the
i2cgroup
Linux Setup
sudo usermod -a -G i2c $USER
sudo modprobe i2c-dev
Log out and log back in for group changes to take effect.
Environment Variables
See .env.example for all available configuration options.
Key variables:
DDC_API_KEY- API key for server authentication (required)MCP_TRANSPORT- Transport type:sseorstdio(default:sse)MCP_PORT- HTTP port for SSE transport (default:8000)MQTT_ENABLED- Enable MQTT client (default:false)MQTT_HOST- MQTT broker IP/hostname (default:localhost)MQTT_PORT- MQTT broker port (default:1883)MQTT_USERNAME- Auto-configured asddc-mcpMQTT_PASSWORD- Auto-configured fromDDC_API_KEY
Architecture
┌─────────────────────────────────────────┐
│       DDC/CI Control Bridge             │
│                                         │
│  ┌─────────────────┐  ┌──────────────┐ │
│  │  MCP Server     │  │ MQTT Client  │ │
│  │  - Resources    │  │ - Pub/Sub    │ │
│  │  - Tools        │  │ - Discovery  │ │
│  └────────┬────────┘  └──────┬───────┘ │
│           │                  │         │
│           └────────┬─────────┘         │
│                    │                   │
│           ┌────────▼────────┐          │
│           │ DDC Controller  │          │
│           │ - VCP Scanning  │          │
│           │ - Read/Write    │          │
│           └────────┬────────┘          │
└────────────────────┼───────────────────┘
                     │
            ┌────────▼────────┐
            │ Physical Monitor│
            │   (DDC/CI)      │
            └─────────────────┘

External Clients:
┌──────────────┐  ┌──────────────┐  ┌──────────────┐
│ AI Agents    │  │ MQTT Broker  │  │ Automation   │
│ (via MCP)    │  │ (any broker) │  │ Platforms    │
└──────────────┘  └──────────────┘  └──────────────┘
License
MIT
Documentation
- Home Assistant Integration Guide - Complete HA setup
- Development Guide - Technical architecture and development details
Contributing
Contributions welcome! Please open an issue or PR.
Troubleshooting
No monitors found
- Ensure DDC/CI is enabled in your monitor's OSD settings
- On Linux, check if i2c devices are available:
ls -l /dev/i2c-* - Try running with elevated permissions (not recommended for production)
MQTT connection failed
- Verify MQTT broker is running
- Check credentials match the server output
- Ensure firewall allows MQTT port (1883)
Commands not working
- Check server logs for errors
- Verify monitor supports the VCP code
- Some codes may be read-only
- Try restarting both server and Home Assistant
Reviews
No reviews yet
Be the first to review this server!
More Developer Tools MCP Servers
Fetch
Freeby Modelcontextprotocol · Developer Tools
Web content fetching and conversion for efficient LLM usage
80.0K
Stars
4
Installs
5.3
Security
No ratings yet
Local
Toleno
Freeby Toleno · Developer Tools
Toleno Network MCP Server — Manage your Toleno mining account with Claude AI using natural language.
137
Stars
518
Installs
8.0
Security
4.8
Local
mcp-creator-python
Freeby mcp-marketplace · Developer Tools
Create, build, and publish Python MCP servers to PyPI — conversationally.
-
Stars
72
Installs
10.0
Security
4.6
Local