Back to Browse
Free

Server data from the Official MCP Registry
MCP server for Adobe Photoshop automation - control Photoshop from AI assistants
About
MCP server for Adobe Photoshop automation - control Photoshop from AI assistants
Security Report
7.8
Moderate7.8Low RiskValid MCP server (1 strong, 1 medium validity signals). 3 known CVEs in dependencies (0 critical, 2 high severity) Imported from the Official MCP Registry. Trust signals: trusted author (6/7 approved). 1 finding(s) downgraded by scanner intelligence.
3 files analyzed · 4 issues found
Security scores are indicators to help you make informed decisions, not guarantees. Always review permissions before connecting any MCP server.
Permissions Required
This plugin requests these system permissions. Most are normal for its category.
How to Install
Add this to your MCP configuration file:
{
  "mcpServers": {
    "io-github-alisaitteke-photoshop-mcp": {
      "args": [
        "-y",
        "@alisaitteke/photoshop-mcp"
      ],
      "command": "npx"
    }
  }
}Documentation
View on GitHubFrom the project's GitHub README.
Photoshop MCP Server
v1.1+ — recipe workflows, fewer round-trips, snappier sessions. Standalone UI ships Action Plan (beta) for plan-then-execute runs.
Note: This is an unofficial, community-maintained project and is not affiliated with or endorsed by Adobe Inc.

![]()
![]()
![]()
![]()
A Model Context Protocol (MCP) server that enables AI assistants like Claude and Cursor to control Adobe Photoshop programmatically. This allows you to create designs, manipulate images, and automate Photoshop workflows through natural language commands while working in your IDE — or through the bundled standalone web UI, which supports both API keys and CLI subscription accounts (Claude Code / Gemini CLI). The UI also offers an opt-in Action Plan (beta) mode that plans every Photoshop step in one LLM call, then runs them in a single pass.
🖥️ Standalone UI (no IDE required)
Don't want to wire this into Claude Desktop or Cursor? The same package ships a fully local web UI that lets you chat with an AI model and drive Photoshop through this MCP server underneath. Connect with a provider API key or, for Anthropic and Google, reuse the OAuth session from Claude Code or Gemini CLI — no separate API key required.
npx -p @alisaitteke/photoshop-mcp photoshop-mcp-ui
That's it. A local server starts on 127.0.0.1 (random free port) and your
default browser opens the chat UI automatically.
Supported providers
Pick any of the following on first launch — use an API key or your existing CLI subscription account (Anthropic and Google):
| Provider | Models | API key | CLI account |
|---|---|---|---|
| Anthropic | Claude Sonnet / Opus / Haiku | console.anthropic.com | npm i -g @anthropic-ai/claude-code → claude auth login |
| OpenAI | GPT-5, GPT-4.1, o-series | platform.openai.com | — |
| Gemini 2.5 Pro / Flash / Flash-Lite | aistudio.google.com | npm i -g @google/gemini-cli → gemini auth login | |
| OpenRouter | 100+ models from any provider | openrouter.ai | — |
Authentication modes
api_key(default) — Vercel AI SDK + your provider API key. Usage is billed per token at API rates; the UI shows estimated cost per chat.cli_account— Uses your local Claude Code or Gemini CLI OAuth session. No API key is stored; the UI probesclaude auth status/geminiheadless to verify login. Usage counts against your subscription quota, not API billing — the status bar shows "Included in subscription".
You can switch auth method per provider in Settings without losing the other credential (e.g. keep an API key while trying CLI account, then switch back).
Action Plan (beta)
An optional execution mode in the standalone web UI for API key auth only
(cli_account always uses the default agentic flow). Turn it on with the
Action Plan toggle next to the model selector in the composer.
Instead of a per-step ReAct loop (model → tool → model → tool …), Action Plan:
- Makes one planning LLM call that outputs an ordered todo list of Photoshop MCP tool calls with parameters.
- Executes those tools directly in sequence — no extra model round-trips between steps.
- On a failed step or unresolved dependency, runs a bounded repair loop (re-plans only the remaining steps, up to 3 times).
The plan appears as a live todo list above the tool-call cards, with per-step
status (pending → running → done / error). Plans are persisted in chat
history so they survive reload. The toggle is off by default; the existing
agentic flow is unchanged when Action Plan is disabled.
Good for multi-step prompts such as "remove the background and export for web" where you want fewer model calls and faster end-to-end execution.
What happens on first launch
- Pick a provider and choose API key or Uses your account.
- Validate the key or check the CLI connection. Config is stored locally at
~/.photoshop-mcp/data.db(SQLite,chmod 600). API keys never leave your machine; CLI mode inherits OAuth from~/.claude/or~/.gemini/. - Type natural-language prompts. The UI streams the model's reply, runs Photoshop tool calls in real time, and renders each tool call as an inspectable card (input + result).
- Switch provider, auth method, or model anytime from Settings / model selector — chats, costs and tool history are persisted across sessions.
Switching auth method later
Open Settings from the sidebar at any time:
| Action | API key mode | CLI account mode |
|---|---|---|
| Set up | Paste key → Save | Install CLI → auth login → Check connection |
| Switch away | Choose API key — stored key is kept | Choose Uses your account — key is not deleted |
| Custom binary | — | Optional CLI path if claude / gemini is not on PATH |
| Cost display | Per-token estimate in status bar | Included in subscription badge |
Auth method is stored per provider in ~/.photoshop-mcp/data.db (authMethod:
api_key or cli_account). Existing configs without authMethod default to
api_key and keep working unchanged.
CLI flags
photoshop-mcp-ui [--port 5174] [--host 127.0.0.1] [--no-open]
Notes
- The agent is restricted to Photoshop MCP tools only — built-in shell, file and web tools are disabled.
- Tech stack: Vue 3 + Tailwind v4 + shadcn-vue
on the frontend; Hono on the backend. API-key mode uses
the Vercel AI SDK; CLI account mode uses the
Claude Agent SDK (Anthropic)
or Gemini CLI headless
stream-json(Google). All paths talk to this same Photoshop MCP server over STDIO. - CLI account limitations: Gemini headless may open a new session each turn
(history is prepended to the prompt). Anthropic CLI account consumes
subscription quota. OAuth login is macOS-first (
claude auth login/gemini auth loginin Terminal).
AI/Prompt Layer for Photoshop
On top of atomic photoshop_* tools, the server ships an opinionated AI/prompt
layer that helps host LLMs (Cursor, Claude Desktop, etc.) translate vague user
requests into reliable Photoshop actions:
- Server
instructions— workflow contract advertised on MCPinitialize(ping once, state-before-action, prefer recipes, error recovery). Seesrc/prompts/instructions.ts. - MCP
promptsprimitive — 16 pre-engineered templates (12 recipe + 4 guide:ps.enhance_portrait,ps.remove_background,ps.gradient_fade,ps.sky_blend, …) viaprompts/listandprompts/get. - Recipe tools — 12 outcome-oriented
photoshop_recipe_*tools (remove background, enhance portrait, prepare for web, export social variants, color grade, frequency separation, batch mockup, organize layers, gradient fade, sky blend, dodge & burn, remove distraction). Each wraps steps in a single Photoshop history state (one Undo reverts all). 80 tools total (68 atomic- 12 recipe).
- State & preview —
photoshop_get_state(cheap snapshot),photoshop_get_preview(base64 JPEG for vision verification),photoshop_get_capabilities(version-aware feature flags). - Structured errors — failures return JSON envelopes with
codeandsuggested_next_toolfor self-correction.
Full reference: docs/prompt-layer.md.
Verify parity: npm run verify:photoshop-prompts. Latest results:
docs/development.md#integration-test-results.
Example Prompts
Below are example prompts you can use with AI assistants (Claude, Cursor, etc.)
when this MCP server is configured. Prefer recipe tools (photoshop_recipe_*)
for multi-step outcomes — each recipe is a single undo step. Use atomic
photoshop_* tools only for fine-grained edits no recipe covers.
Ping Photoshop and read capabilities for my installed version.
Get the current document state before changing anything.
Open portrait.jpg, get a downscaled preview so you can verify the subject.
After each major recipe, get another preview to confirm the result.
Enhance the portrait on the active layer at medium intensity with skin smoothing.
Use the enhance-portrait recipe — I want frequency separation + auto-tone in one undoable step.
If the active layer is text or a Smart Object, rasterize first or pick a raster layer.
Show me a preview when done.
Equivalent MCP prompt template: ps.enhance_portrait with { intensity: "medium", skin_smoothing: "true" }.
Remove the background from the active portrait layer.
Use Select Subject + a layer mask with a 2px feather. Keep the original pixels behind the mask.
The subject must be on the active layer — not a flat color fill.
Equivalent MCP prompt template: ps.remove_background with { feather_px: "2", keep_shadow: "false" }.
Apply a warm film color grade to the open document as non-destructive adjustment layers.
Use the apply-color-grade recipe with preset warm_film.
Preview the result when finished.
Set up frequency separation on the active raster layer with a 6px blur radius.
I will paint on the Low and High layers myself — do not apply extra smoothing.
Tell me which layers to edit when the stack is ready.
Equivalent MCP prompt template: ps.frequency_separation with { radius_px: "6" }.
Prepare the active document for web: sRGB, downscale, sharpen, export one optimized JPEG to ~/.photoshop-mcp/exports.
Then export Instagram post and X post variants as separate JPEGs from the same document.
List the output paths in a table.
Equivalent templates: ps.prepare_for_web, ps.export_social_variants.
I have a mockup PSD open with a Smart Object layer named "Screen".
Replace it with every PNG/JPG in ~/assets/mockups/ and export one JPEG per asset.
Do not place flat layers — swap the Smart Object so perspective is preserved.
Equivalent MCP prompt template: ps.batch_mockup_replace.
Organize the layer stack: rename by kind, auto-group related layers, preserve originals.
Run the organize-layers recipe, then list layers so I can review the new structure.
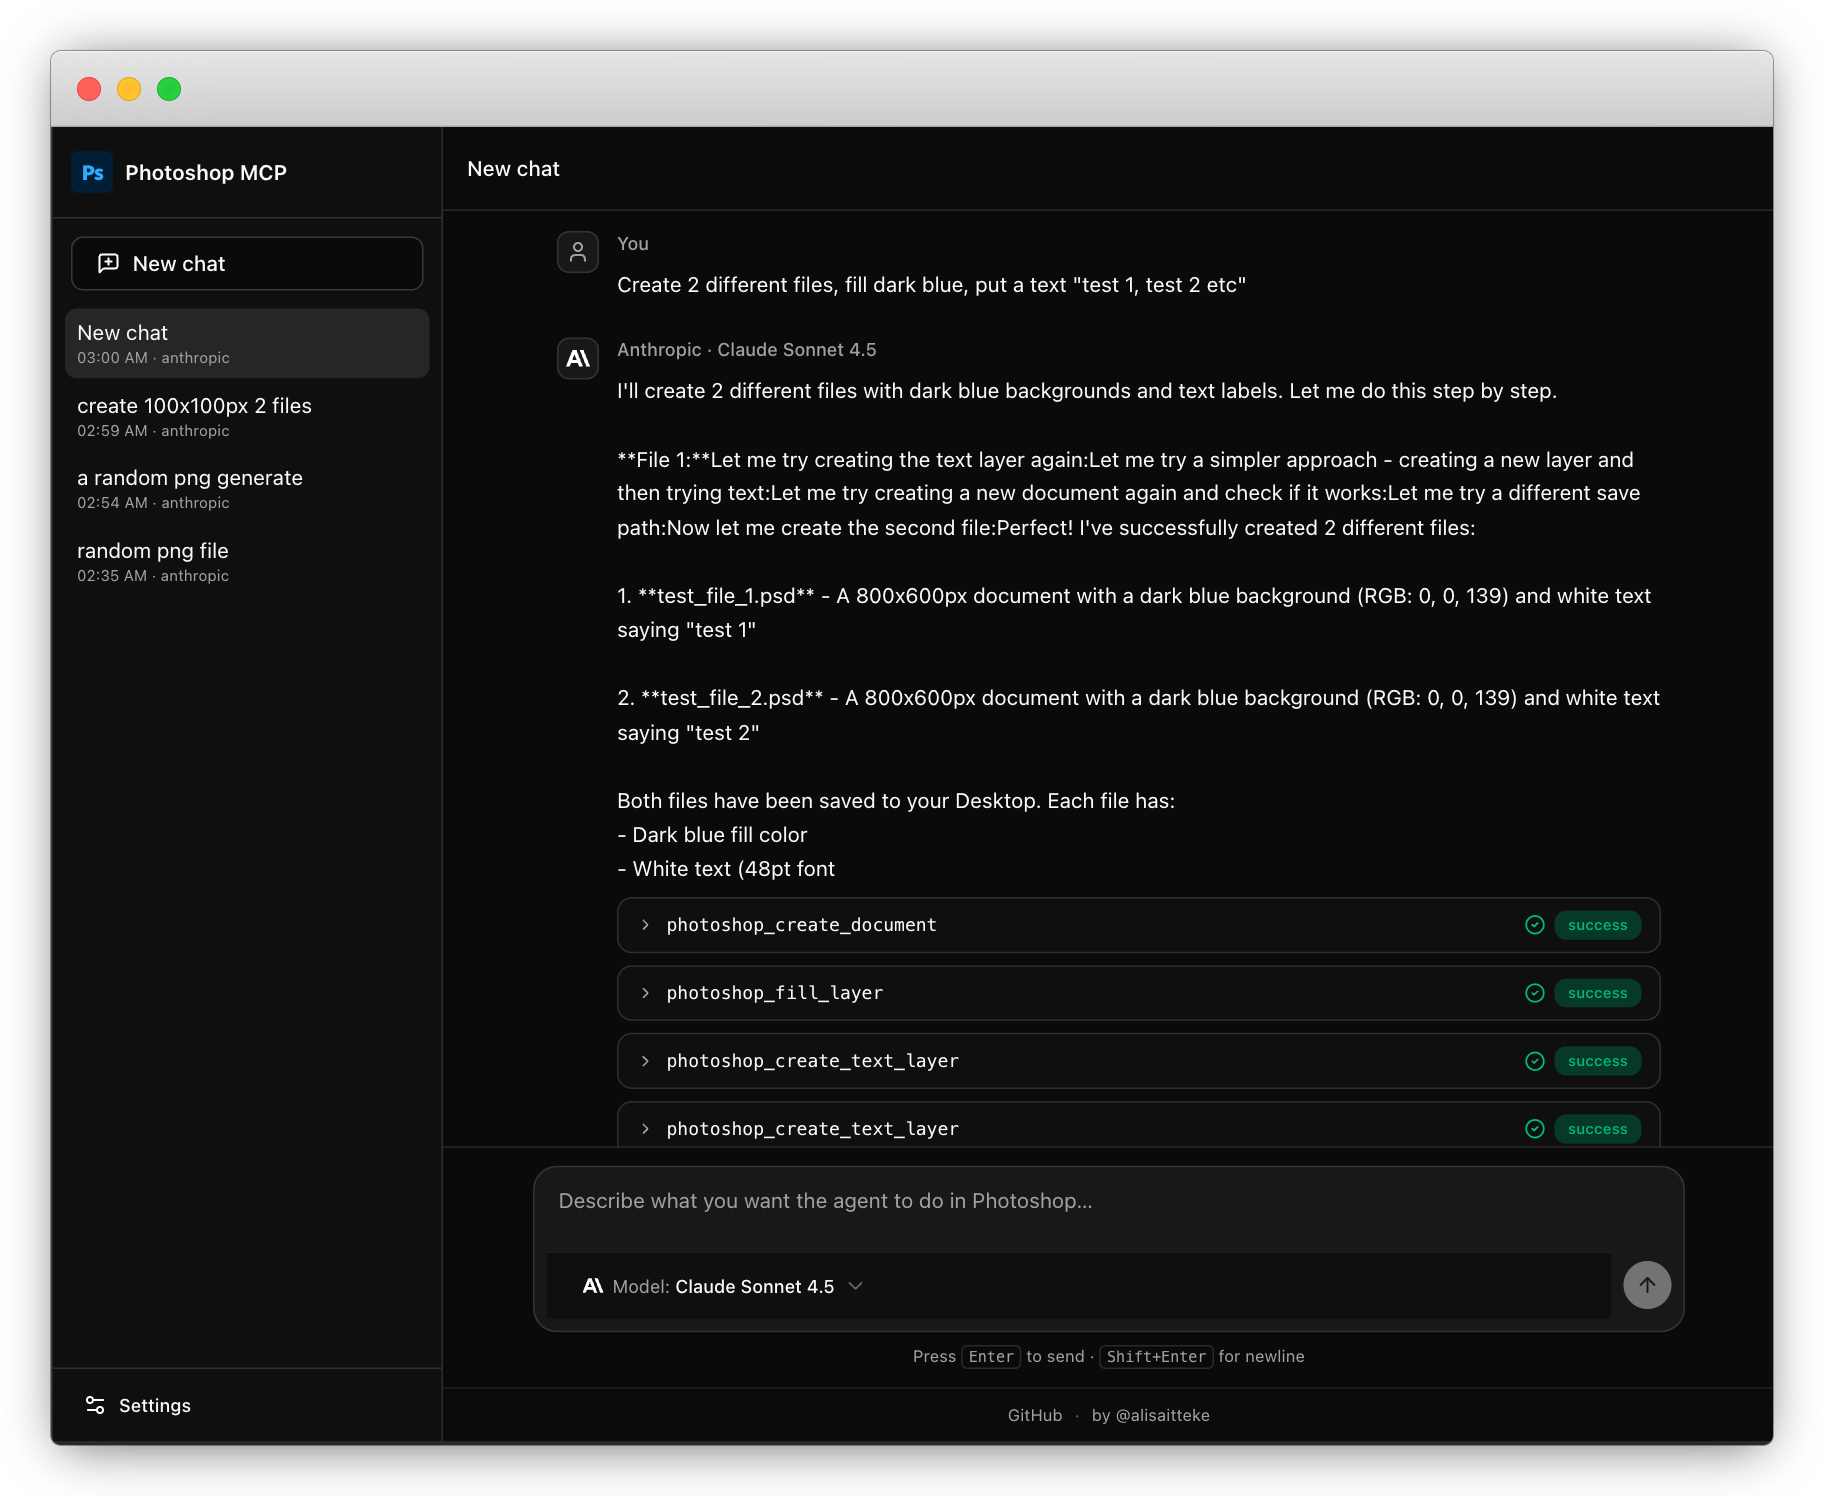
Create a 1920x1080 Photoshop document with RGB color mode.
Add a light blue background layer and fill it with RGB(240, 248, 255).
Add centered text "Welcome" in 64pt font.
Save as welcome.psd to my Desktop.
Search Pexels for "mountain sunset" images.
Create a 1920x1080 Photoshop document.
Place the downloaded image and fit it to fill the entire canvas.
Apply a subtle Gaussian blur of 3px.
Increase brightness by 15 and contrast by 10.
Add white text "Adventure Awaits" centered at the top in 72pt.
Set the text opacity to 90% and blend mode to OVERLAY.
Save as adventure.jpg with quality 10.
Open photo.jpg from my Desktop in Photoshop.
Get state, then run the enhance-portrait recipe at low intensity.
If I only need quick tone fixes, apply auto levels, auto contrast, and unsharp mask (120%, 1.5, 0) on the active layer instead.
Adjust hue +15 and saturation +15, or use prepare-for-web when I'm ready to export.
Save as enhanced-photo.jpg with quality 12.
Create a 1200x800 document.
Add a new layer named "Background" and fill with RGB(50, 50, 50).
Place logo.png at position (100, 100).
Fit the logo layer to 50% of its current size.
Set blend mode to SCREEN and opacity to 85%.
Add another layer, fill with RGB(255, 100, 50).
Set this layer's blend mode to MULTIPLY and opacity to 60%.
Merge all visible layers.
Save as composite.psd.
Create a 1080x1350 portrait document (Instagram story size).
Add a layer and fill with gradient-like color RGB(120, 40, 200).
Add text "SUMMER" at (540, 300) in 96pt.
Change text color to white RGB(255, 255, 255).
Set text alignment to CENTER.
Add another text "2026" at (540, 450) in 128pt, white color.
Apply Gaussian blur 2px to the background layer.
Save as summer-poster.png.
Open image1.jpg.
Resize to 1920x1080.
Apply auto contrast.
Apply subtle sharpen (amount 80%, radius 1.0).
Save as processed-1.jpg with quality 10.
Close without saving changes to original.

Repeat for image2.jpg and image3.jpg.
Create a 2000x2000 square document.
Place abstract-pattern.jpg and fit to fill document.
Duplicate the layer.
On the duplicate, apply motion blur at 45 degrees, radius 50px.
Set blend mode to OVERLAY and opacity to 70%.
Add centered text "MOTION" in 120pt white.
Apply a rectangular selection from (200, 200) to (1800, 1800).
Invert the selection and delete (to create a border effect).
Flatten the image.
Save as motion-art.jpg.
Create a 3000x2000 document at 300 DPI for print.
Place hero-image.jpg and fit to fill the canvas.
Duplicate the image layer.
On the duplicate, desaturate it completely.
Set blend mode to LUMINOSITY and opacity to 50%.
Create a new layer named "Overlay".
Fill with RGB(255, 150, 0) and set blend mode to SOFTLIGHT at 30% opacity.
Add text "PORTFOLIO" at top center (1500, 200) in 96pt.
Set text color to white.
Add subtext "2026 Collection" at (1500, 320) in 36pt.
Create a rectangular selection around the text area.
Create a layer mask on the overlay layer.
Merge visible layers.
Save as portfolio-cover.psd.
Export as portfolio-cover.jpg at quality 12.
Open my-photo.jpg.
Play the "Vintage Look" action from "My Actions" set.
Adjust brightness by -10 to darken slightly.
Save as vintage-photo.jpg.
Execute this custom ExtendScript code:
app.beep();
alert('Processing started!');
Apply Gaussian blur 15px to the active layer.
[Wait for result]
Actually, that's too much blur. Undo that.
Apply Gaussian blur 5px instead.
Or:
Get the history states to see what operations were performed.
Undo the last 3 operations.
Redo 1 step to bring back one operation.
If a recipe returns version_unsupported or generative_unavailable, call get_capabilities and tell me which Photoshop feature is missing.
If a tool fails with suggested_next_tool, follow that hint (e.g. rasterize_layer before a raster-only recipe).
Never guess — read get_state after a failure and propose the next single step.
Features
- Standalone web UI — local chat interface (
photoshop-mcp-ui); API key or CLI subscription auth per provider (Anthropic, Google) - Action Plan (beta) — opt-in plan-then-execute mode in the web UI (API key only): one planning call, direct tool execution, bounded repair on failure
- Works on both Windows and macOS
- Supports Photoshop 2012-2025+
- ExtendScript API: Universal compatibility via AppleScript/COM automation
- Auto-Detection: Automatically finds Photoshop installation on your system
- 78 Tools: 66 atomic
photoshop_*+ 12 recipephotoshop_recipe_* - AI/Prompt Layer: 16 MCP prompt templates (12 recipe + 4 guide), server instructions, state/preview/capabilities tools
- Document Management: Create, open, save, close, crop documents
- Layer Operations: Create, delete, duplicate, merge, transform layers
- Layer Properties: Opacity, blend modes, visibility, locking
- Text Formatting: Font, size, color, alignment controls
- Image Placement: Place images, open files, fit to document
- Filters: Gaussian Blur, Sharpen, Noise, Motion Blur
- Color Adjustments: Brightness/Contrast, Hue/Saturation, Curves, Auto Levels/Contrast
- Selections & Masks: Rectangular selections, select subject, content-aware fill, gradient mask, layer masks
- History Control: Undo/Redo operations, view history states
- Actions: Play recorded actions, execute custom scripts
- Auto-Rasterize: Automatically converts layers when needed for filters
- Context Tracking: Returns document/layer state after each operation for AI context awareness
Installation
Using NPX (Recommended)
No installation required! Just configure your MCP client:
npx @alisaitteke/photoshop-mcp
To hack on the repo locally, see From Source in the development guide.
Configuration
For Cursor
Add to your Cursor settings (.cursor/config.json or workspace settings):
{
  "mcpServers": {
    "photoshop": {
      "command": "npx",
      "args": ["-y", "@alisaitteke/photoshop-mcp"],
      "env": {
        "LOG_LEVEL": "1"
      }
    }
  }
}
For Claude Desktop
Add to your Claude Desktop config (~/Library/Application Support/Claude/claude_desktop_config.json on macOS or %APPDATA%\Claude\claude_desktop_config.json on Windows):
{
  "mcpServers": {
    "photoshop": {
      "command": "npx",
      "args": ["-y", "@alisaitteke/photoshop-mcp"],
      "env": {
        "LOG_LEVEL": "1"
      }
    }
  }
}
Environment Variables
PHOTOSHOP_PATH: (Optional) Specify custom Photoshop installation pathLOG_LEVEL: Logging level (0=DEBUG, 1=INFO, 2=WARN, 3=ERROR)POSTHOG_DISABLED: Set to1ortrueto disable anonymous usage analytics entirelyPOSTHOG_KEY: (Optional) Override the PostHog project key used for analyticsPOSTHOG_API_HOST: (Optional) PostHog ingest host (default:https://a.alisait.com)POSTHOG_UI_HOST: (Optional) PostHog UI host for dashboard links (default:https://eu.posthog.com)
Available Tools
Full reference for all atomic photoshop_* tools (parameters, examples, and usage):
docs/available-tools.md.
Context Tracking
Each tool returns comprehensive context information about the current state of Photoshop, including:
- Document Info: Name, dimensions, resolution, color mode, layer count
- Active Layer Info: Name, type, opacity, blend mode, visibility, lock state
- Selection State: Whether a selection is active
- Operation Result: Specific details about what was changed
This allows AI assistants to maintain awareness of:
- Which document is active
- Which layer is being worked on
- Current layer properties (opacity, blend mode, etc.)
- Document dimensions and settings
Example Response:
{
  "applied": true,
  "filter": "Gaussian Blur",
  "radius": 10,
  "wasRasterized": true,
  "context": {
    "hasDocument": true,
    "document": {
      "name": "design.psd",
      "width": 1920,
      "height": 1080,
      "resolution": 72,
      "colorMode": "RGBColorMode",
      "layerCount": 3,
      "hasSelection": false
    },
    "activeLayer": {
      "name": "Background",
      "kind": "NORMAL",
      "opacity": 100,
      "blendMode": "NORMAL",
      "visible": true,
      "locked": false,
      "isBackground": false
    }
  }
}
This context helps AI assistants remember what document and layer they're working on across multiple commands.
Platform-Specific Notes
Windows
- Uses COM automation to communicate with Photoshop
- Registry-based auto-detection for installation paths
- Supports both 32-bit and 64-bit versions
macOS
- Uses AppleScript/OSA for Photoshop communication
- Spotlight-based auto-detection
- Supports multiple Photoshop versions installed simultaneously
- CLI account auth (standalone UI) is macOS-first: run
claude auth login/gemini auth loginin Terminal; credentials live under~/.claude/and~/.gemini/
Supported Photoshop Versions
- All Photoshop versions (2012-2025+): Uses ExtendScript API via AppleScript (macOS) or COM (Windows)
Important Note: While Photoshop 2022+ supports UXP for plugins, external automation via AppleScript/COM can only use ExtendScript. UXP is designed for internal plugins and cannot be invoked from external scripts. Therefore, this MCP server uses ExtendScript for maximum compatibility across all Photoshop versions.
Troubleshooting
Common connection, scripting, and logging issues:
docs/troubleshooting.md.
Standalone UI — CLI account auth
| Symptom | Likely cause | Fix |
|---|---|---|
cli_not_found | Claude Code / Gemini CLI not installed | npm i -g @anthropic-ai/claude-code or npm i -g @google/gemini-cli |
not_authenticated | No OAuth session | Run claude auth login or gemini auth login in Terminal |
claude / gemini not on PATH | Custom install location | Settings → CLI path → Check connection |
| Chat works in IDE but not UI (CLI mode) | OAuth tokens are CLI-only | Use CLI account in UI; API keys and CLI sessions are separate |
| Gemini multi-turn feels forgetful | Headless CLI may start a fresh session each turn | Known limitation; history is prepended to the prompt (MVP) |
Development
From-source setup, build, lint, integration tests (with latest results), and usage examples:
docs/development.md.
Architecture
Repository layout and module map:
docs/architecture.md.
Contributing
Contributions are welcome! Please read CONTRIBUTING.md before opening a PR.
License
MIT
Anonymous Usage Analytics
Anonymous, aggregated usage events are collected by default to improve the
product. You can opt out at any time. Full details:
docs/anonymous-usage-analytics.md.
Acknowledgments
- Built with the Model Context Protocol SDK
- Inspired by the Adobe Photoshop scripting community
Reviews
No reviews yet
Be the first to review this server!
More Design MCP Servers
Toleno
Freeby Toleno · Developer Tools
Toleno Network MCP Server — Manage your Toleno mining account with Claude AI using natural language.
137
Stars
517
Installs
8.0
Security
4.8
Local
mcp-creator-python
Freeby mcp-marketplace · Developer Tools
Create, build, and publish Python MCP servers to PyPI — conversationally.
-
Stars
72
Installs
10.0
Security
4.6
Local
MarkItDown
Freeby Microsoft · Content & Media
Convert files (PDF, Word, Excel, images, audio) to Markdown for LLM consumption
156.1K
Stars
33
Installs
6.0
Security
5.0
Local